

Cafelat Robot - tamper background and discussion
July 27, 2021 – Kristal Yam

Original post from Paul Pratt on Facebook group
For the tamper discussion to be relevant, I should give some background. Initially the Robot was all aluminium. We have all the die-cast tools for each part. After we received it and had tested for a while we were not happy with the material. It was difficult to keep clean and we were worried about food safety.
After the production had started parts came in and we knew aluminium was not the right choice so I made the decision to switch to stainless steel for everything apart from the body and plate.
Even though some of the item dimensions were changed the Robot had put on weight, about 1.2 kg to be precise. Since shipping weight is a big factor in end user costs I started to look at how we could reduce the weight. One of the places was from the stem of the tamper. This saved around 250g, although ironically my unit cost increased a lot. Solid stainless CNC machined is easier and less expensive. The current tamper is precision cast and then machined.
Having used levers for around 20 years now I do not pay as much attention to tamping as I do on a pump machine. There is something about the gentle pre-infusion that sort of means tamping is not as vital as with other machines. For that reason my philosophy with the Robot is simplicity. I have always found best results with a relaxed approach to tamping. With the standard tamper you simply press down with your fingers and you should not use your palm on the top. I tested the Robot with all kinds of tampers and found they had little to no effect - for me. If at the time I thought that another simpler tamper would produce better results you can be sure I would use it.
The idea behind the thin metal disc like base is a) reduce weight again and b) to reduce any kind of suction with it being such a deep basket. It also has a tapered side, again to hopefully prevent any kind of suction when the tamper is being removed. A standard tamper (that I have been making for 16 years now) will not work because it just sucks the coffee up as you remove it.
Of course that was "my" reasoning for the tamper and I am sure many who prefer a more standard palm pressure tamper. There is no right or wrong way and as I always say you can make it as easy or as complicated as you want. The very deep basket sort of dictates what I can and can't do though. It was very important for me to have a stainless steel tamper though and so I came up with the standard tamper which was stainless, did the job and was lighter than a solid one.
 |
 |
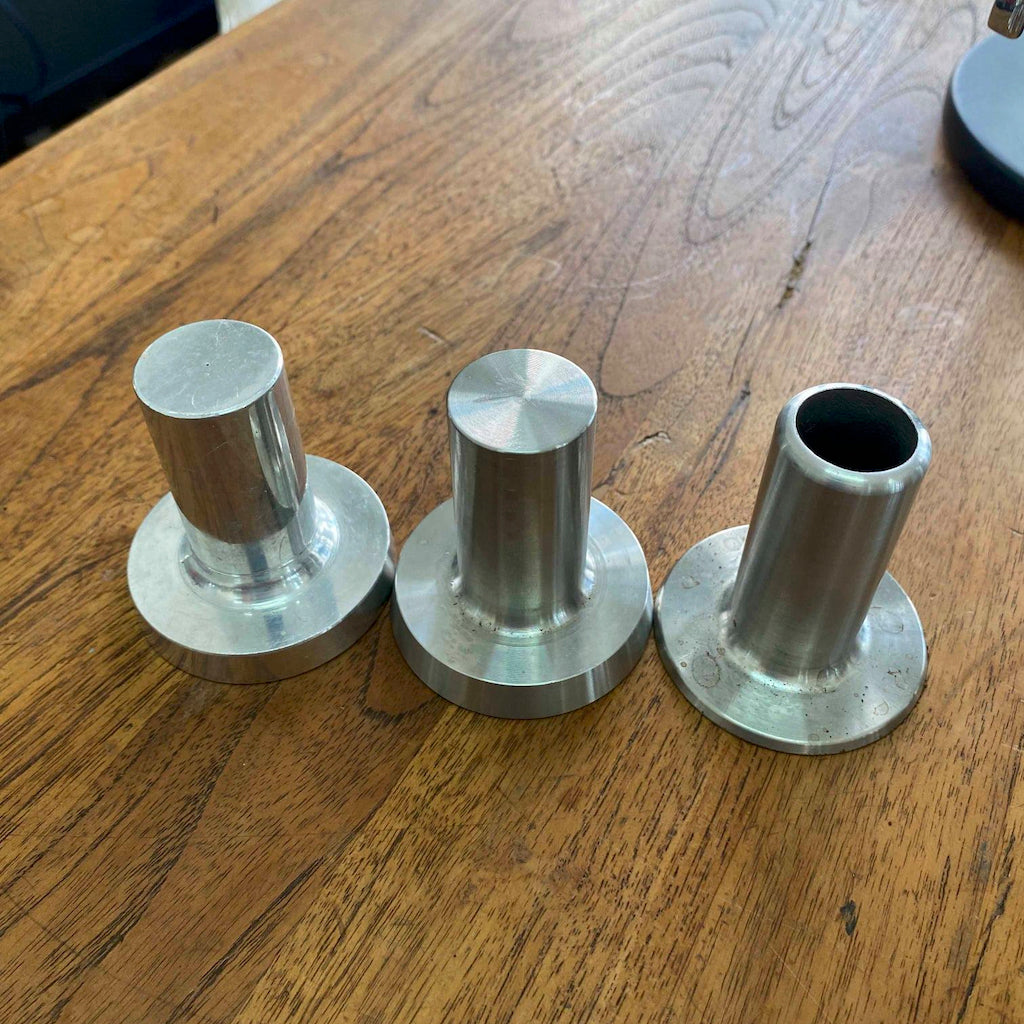 |
In the photos you can see an all aluminium V1 Robot, they also had the cafelat name in the casting. This had to be abandoned as the powder coating company would not work with that. You can also see the tampers from L to R 1. My hand turned prototype I came up with 2. solid steel V1 and 3 the current version.
The levelling tamper is a different ball game. If you are chasing hard packed tamps then this probably for you. There really is no right or wrong way, go with whatever you feel comfortable (pun intended) with. So obviously the POM section provides the stabilising support and I have reliefs machined into it to allow air in and, yep you guess it, to prevent suction again. The middle section is CNC precision machined at considerable cost. If we made a mold the item would be peanuts but we would sacrifice some precision. Originally I wanted a top section so you could buy say a $10 plastic part and fit it over your existing tamper. This did not work out, if you have 3D printed your own handle you may have realised why this is not a "one size fits all" solution. Each basket has a tolerance. Each tamper has a tolerance.
The standard tamper does work well, granted the hollow section may not be to everyone's liking but I do hope I have tried to explain a bit about why it is the way it is and why from my own point of view it works. If people are putting corks in the end then that may be the push I need to make a silicone end cap!